My girls have decided they love painting. In fact, they want our craft every day to include painting. I love painting also, but as much as I am NOT a perfectionist when it comes to keeping house, over the past 15 days, I’ve learned that I AM a perfectionist when it comes to these crafts. I see the idea on Pinterest and I latch on to that idea. And then it doesn’t turn out like I’d envisioned. Ever. This DIY Picture Frame Craft is no different. Did they turn out darling? Yes. Did they turn out Pinterest-y? No. But that’s what I’m learning over the course of these 31 days. I’m learning to let go. I’m learning that it doesn’t have to look like the picture on Pinterest to be perfect.

DIY Picture Frame
Preparation time: 15 minutes
Project time: ~25 minutes
Project cost: $ Low
Parental involvement: Low
Inspiration: Toilet Paper Roll Painting…A DIY Project from Creative Carmella
Supplies:
- Cardboard box (I used the lid part of a diaper box. It was perfect!)
- Sharp scissors or an exact-o knife
- Paint in two colors
- A large paint brush or sponge
- A clean (empty!) toilet paper or paper towel tube
- Hot glue
- Magnets (I like the circle ones that are super strong!)
Preparation instructions:
- Cut a square from the box. Cut a smaller square out of the center. You can vary the sizes of these squares greatly to come up with different sized frames. My big square is about 6″x6″ and my little square is about 2″x2″.
Step by step instructions:
- Give your child the square and one color of paint. (Let them choose their color. It’s more fun for them that way!)
- Have them paint the entire thing using a large paintbrush.
- Let dry.
- Put the other color of paint on their pallet (I always use junk mail) and spread it out so it is wider than the toilet paper tube. Demonstrate dipping the end of the tube in the paint and dabbing it on the frame. Then, let them at it! This was the hardest part for me. H’s frame looked really cute, but she decided she wasn’t done and added more. I really, really, REALLY wanted to stop her when I thought it looked nice, but I decided not to squelch her creativity and let her do it the way she thought it looked nice.
- Let dry.
- Hot glue the magnets on the back of the frame. Tape a picture in the frame or just use the magnets to hold it in place.
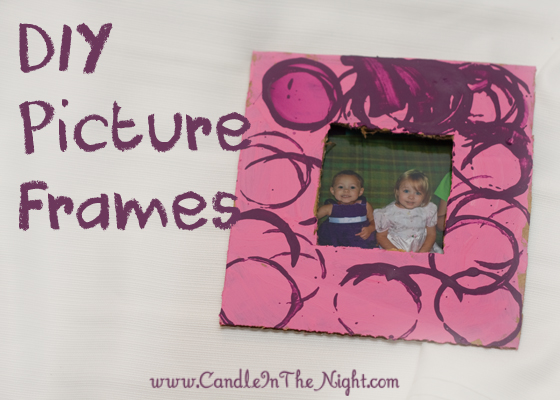
If you decide to make this DIY Picture Frame, be sure to come back and tell me about it! Take pictures and share them on my Facebook sharing post! I’d love to see what you and your little ones are making together!
This post is part of my 31 Days of Easy Crafts for Kids series. Be sure to check out the rest of the crafts I’m doing this month!

They are adorable b/c you can tell the kids did them, not the adults. When I go into a preschool and see a whole row of paintings, or whatever craft for the day, I can tell immediately if the children were allowed to work, or the teacher did it. Not so cool when the teacher does it.
For home, however, (future use) could you be prepared for each of them to do two? Then when the first one looks “great” you could say, “that looks great — want to start on the next one?” Usually they will say yes!
And for a project with this little cost, it’s worth it! Let them go as long as they want on the second one!