Lately, I’ve been making some really fun crochet cabbage patch kid hats. They’ve turned out super cute, so I decided to try something different. I wanted to make a hat with curls! I searched the internet for “how to curl yarn” and tried a few different methods, but they weren’t working well. So…I tried my own method at the risk of melting some yarn and ruining a pan. But it worked! Beautifully!!
***Want to be sure you can find this later? Pin it now!***
So today, I’m going to share that method with you!
How to Curl Yarn
(I used this method to curl acrylic yarn, but according to this article, a similar method is used for wool yarn.)
Supplies:
Acrylic yarn
Knitting needles or wood dowels
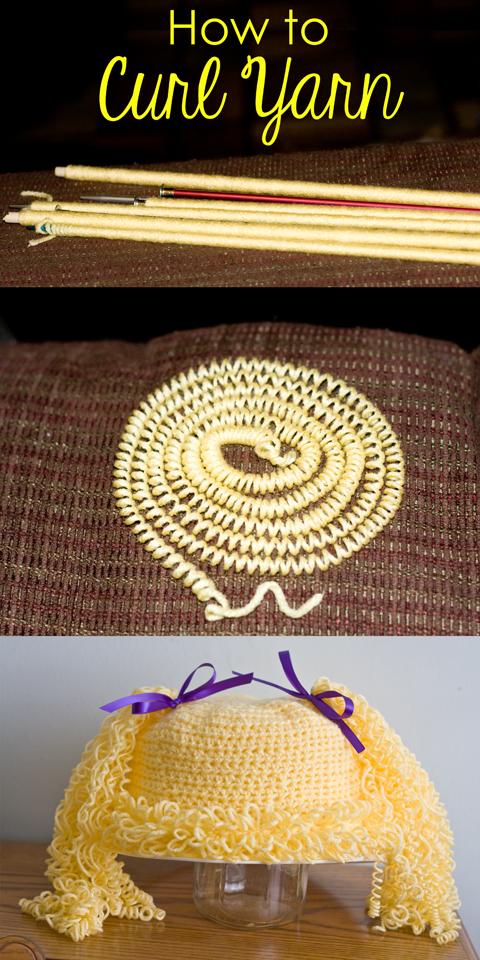
Step 1: Wrap your yarn tightly around knitting needles or dowel rods. Use a variety of sizes for a variety of curl sizes. Tie both ends so the curls don’t come undone.

Step 2: Preheat oven to 200 degrees Fahrenheit.
Step 3: Wet yarn thoroughly.
Step 4: Lay yarn-wrapped knitting needles and dowels on a cookie sheet.
Step 5: Place cookie sheet in oven and bake for 15 minutes.
Step 6: Remove and let cool until yarn is completely cool and dry. (See those curls on the left that are looser than all the others? I didn’t let them dry completely before unwrapping them.)
Step 7: Gently unwrap yarn from dowels. You will have a nice, tight curl. Use your fingers to gently pull curls looser to achieve the look you want.

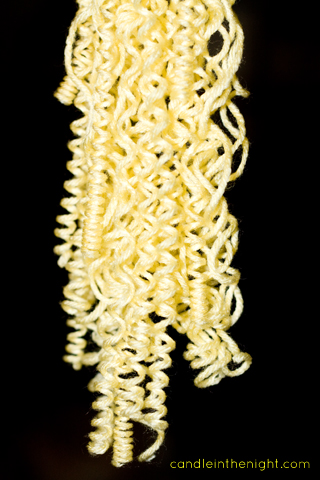
And that’s it! It’s SO easy and I LOVE the results!
Have you tried to curl yarn before? What kind of projects would you use this technique for?

Now that is a cool! I will be sharing this with my daughter. She loves to crochet. Found you at Mom 2 Mom link up.
Thanks for visiting!
This sounds quite easy and it looks great. I will use it for my amigurumi dolls.
Thanks
What an incredibly neat idea! Something I know I likely wouldn’t have thought of on my own. I’m glad I came across this, for I know I’ll be able to reference when I’m in need of curled yarn (presents anyone?) 🙂
Stopping by from Capture Your Journey!
I found a quicker way, after wrapping, just place them on ironing board cover with a some fabric and steam iron them all both sides, let cool and you have curls 🙂
Brilliant!! Thank you for sharing!
Did you wet the yarn at all? Or simply just steam? Thanks!
I just run the stick wrapped in yarn under running water to get the yarn good and wet. Then bake and let dry. Don’t unwrap the yarn until it is ALL the way dry. Hope that helps!
would this method work in the microwave rather than conventional oven do you think?
It might, but you might also damage your yarn. You want slow, low heat.
If you plan to try the microwave, please use wooden knitting needle, not metal!!
Oh, definitely!
I wet it all really good!
Oh wow Thanks I like that idea! I make fabric/ Ragdolls and wanted to know how to do this y’all are Awesome!!!
Once you make the curls and attach them to doll, are they washable? I’m making a doll for a toddler.
I haven’t needed to wash mine, but I’m assuming that the curls would wash out if dunked in water.
Do you know how long the curls last?
Until the yarn gets wet, as long as you’re not pulling on them constantly.
How to you attach the hair?
A site mentioned spraying lightly with laquer to keep the curls – ever hear of this or do it? Anybody??? What is lacquer that you would use? Any idea???
I wouldn’t spray in lacquer if you intend to gift the doll to a child… just in case they decide to chew on the hair or put it in their mouth… you know how kids are! 🙂
I use the old fashioned way my mum taught me,knit a oblong piece of knitting in stocking stitch using about size 9(uk size) needles in whatever colour you want and cast off to finish.Wash the knitted piece of wool in hot water and leave to dry.You just need to unpick the piece then and you have curly wool for hair.
Interesting….I curl yarn for mermaids and the instructions I found said 200 degrees for an hour, soe i I”ve always kept mine in the oven that long. Now I’m tempted to pull them out of the oven soon er because that hour takes FOREVER! Thanks for the tip, hope it works for me.
I tried the link to view the article for how to curl cotton yarn but it didn’t work. Can you tell me what to do for non-acrylic yarn?
I wrapped sticks in the sewing machine and did as you taught. Thank you
I wrapped wool onto a stick then used my small straighteners , it worked great & was very quick . I made them quite long then placed so many together & stitched them on the head , going from front one after the other all the way down the back.
That’s a great idea!
Thks for sharing! This method is one of the quickest methods I have seen!