Remember a few weeks ago when I asked all my Facebook friends to vote on their favorite project and I’d come back and do a video tutorial? Well, today’s the day!! There was a definite winner on the Facebook vote, but unfortunately, it was more of a Christmas project. So…I’ll be saving it for next Christmas season. In second place, there were several different projects, so I took it upon myself to choose. These adorable wood block snowmen won out. So today, I’m sharing a step-by-step tutorial on how to make them along with a two part video! I had so much fun making these wood block snowmen and they look SO cute on my piano!
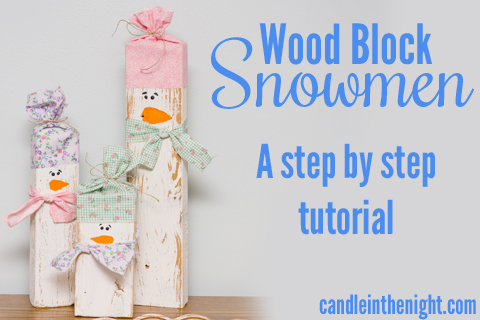
Right?? Adorable!! So without further chatter…the tutorial!
How to Make Wood Block Snowmen
Materials:
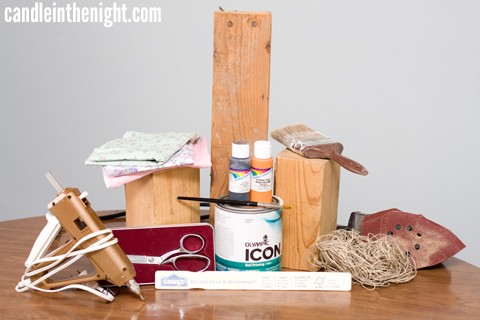
- Three wood blocks of different heights (I ended up with a third size, not pictured here)
- Damp rag
- White paint (I used interior self-priming, but that’s just because I had it on hand. You could also use craft paint.)
- A large paint brush
- Paint stirrer
- Black and orange acrylic craft paint
- Small paint brush
- Sandpaper and/or electric sander
- Three colors of fabric
- Scissors
- Twine
- Measuring tape
- Glue gun
Step 1: Clean your wood blocks
If your blocks have any kind of dirt on them, wipe them down. These had been sitting in our garage for awhile, so they needed a good wipe-down.
Step 2: Paint your wood blocks
Using the white paint paint all four sides of your blocks. You don’t need to paint the top or bottom. Let your paint dry and if you can see through it, paint a second coat.
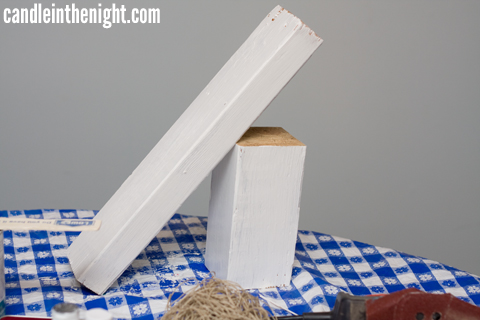
Step 3: Sand down your blocks.
Lightly sand the blocks so that you can start to see the grain of the wood. This makes them look a bit worn and rustic.
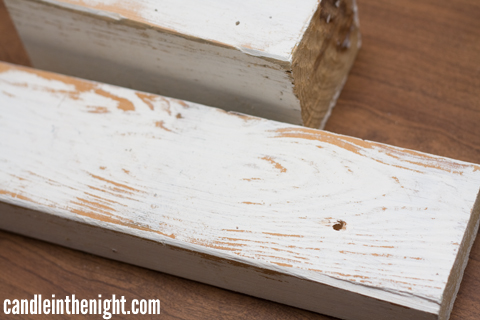
Step 4: Paint on noses and eyes.
Use the brush to paint the noses. Your triangles don’t have to be perfect, in fact, they’ll have more personality if they aren’t! To paint the eyes, use the other end of the paintbrush to make small dots. Draw little lines with the paint for eyebrows.
Step 5: Cut scarf and hat.
Measure around your snowman–that’s your first number. Add six inches to that number. Cut a length from your scarf material your original measurement plus six by one to two inches. For the hat, cut a length as wide as your first number plus one and six inches long. Does that make sense?? So…let’s say your snowman measures nine inches around. Your scarf would be 9+6 which is 15. So…15″ x 1.5″. Your hat would be 9+1 which is 10, so…10″x6″. (If you’re struggling with this, watch the video!)
Step 6: Tie on the scarf.
Tie on the snowman’s scarf using a square knot. If you don’t know how to tie a square knot, check out the video!
Step 7: Put on the snowman’s hat.
Wrap the hat around the snowman’s head. Use hot glue to glue it on in the back. Then, tie a bow using the twine on the top and you’re done! Aren’t they so cute??

And now, the videos!
First, a couple disclaimers.
- My video producers are three and four years old.
- My assistant was a wiggly almost-one year old.
- My memory card runs out at one point
- My head is cut off for most of the videos.
All that to say, welcome to my real life! If I can make these adorable snowmen, so can you! So step into my kitchen for an afternoon and join me as we make a couple of wood block snowmen.
(If you’re reading this in your inbox, click on through so you can watch the videos!)
Super cute and adorable! Can’t wait to make these for my snowman collection. They won’t have to be red and green like a lot of my snowmen, so they can stay out all winter after the Christmas decorations are put away… which I need to get back to now that I’ve finished the video!
They would also make GREAT gifts for friends… can’t wait for next year!
I thought about gifting these to you, but…I just couldn’t! I love them too much! xox!
These are so cute! Such a great idea. Thanks for sharing
These are so super-cute! I want to try these! Thanks for sharing!